Big This Week

Recent Posts

Thursday, 10 December 2015

Everyday Festive Make Up Tutorial | Blogmas | Day Ten

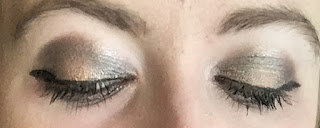
Festive season is here, and I love to add a little glitter to my make up to get right into that Christmas spirit! To me this look is subtle, but some of you may want to use this as a going out make up look instead! This is definitely a look I go straight to at the moment, so down below I've listed all the products I've used and gave a small step by step guide on how to achieve this look! (Pictures down below)


Face
Bourjois Healthy Mix Foundation | Vanilla 52
Hoola Bronzer  | Benefit
Rockateur  Blush | Benefit
High Beam Highlight | Benefit
Arch De Triumph Eyebrow Shaper & Highlight | Soap & Glory

Eyes
Primer Potion | Urban Decay
Anastasia Beverly Hills Self-Made Palette | Pink Champagne 
Make Up Geek Eyeshadow | Mercury
Push-Up Eyeliner | Benefit
They're Real Mascara | Benefit
Black Super Shock Eyeliner | Avon

Lips 
Rimmer Lip Liner | Eastend Snob 063
Mac Matte Lipstick | Please Me 

Step 1.

After I applied my foundation, bronzer and blush etc. I started off with applying my Urban Decay primer potion as a base on my eyes, followed by the shade Pink Champagne from my Anastasia Beverly Hills palette. I made sure this was even all over before I added the shade Mercury in the crease of my eyes! Make sure to blend these well, as seeing a line were the eyeshadows are both applied sometimes ain't pretty! 

Step 2. 

I then grabbed my Push-Up Eyeliner which I absolutely love at the moment! It glides on so smoothly and I definitely recommend this for all the gel/liquid eyeliner lovers out there! I followed that by applying mascara on the top and bottom lashes and also using my eye pencil by Avon, also on my top and bottom waterline for a full look since I wasn't using fake eyelashes! 

Step 3.
Any shade of lipstick would suite this look but I've chosen a nude shade to complete this! I applied my lip liner first, followed by Please Me to get a neat guide and make my lips look a lot more fuller! Lip Liner honestly makes a huge difference and I'd recommend buying some to try if you don't already use it!

Step 4. 
GLITTER. And lots of it! I used a pink shade from Ted Baker to apply in the inner corners of my eyes but you can use any to achieve this look! I also recommend Barry M's Dazzle Dust and this works just as well, if not better! 


What's your go to festive look? Let me know in the comments below!  


Share:

Wednesday, 26 August 2015

Urban Decay | Smoky Palette.


I received the Urban Decay Smoky palette about 3 weeks ago. I can easily say, it's by far my favourite palette from the Urban Decay range. I always tend to go for a smoky eye, so I knew i would completely fall in love with it!

There are a lot more shimmery shades in this palette, which at first I was a little sceptical about, as I would normally prefer matte (due to the shimmer going everywhere) but I can't fault this palette one bit. It's just incredible! 
This look is by far, my most favourite and I get a lot of compliments when I do go for this. Even my boyfriend says how incredible my eyes look and I mean, come on, do guys really notice when you change your shadows? 


First of all, I use the Urban Decay Primer Potion and apply to my eyes which will help keep my eye shadow from creasing and give a longer lasting look!  Next, I take Combust, which is a taupe shade and I apply that as a base to my lids. I then take Slanted (Metallic grey) which I apply to the crease of my eyes. After that, I take Armor (metallic silver) and start applying that to the inner and outer corners of my eyes, leaving a space in the middle which I will then fill with Dirtysweet (bronze). Blend and reapply until you are happy with your finished look. A great dupe for Dirtysweet is Barry M's Bronze Gold which I use more so on nights out to give a more dramatic finish.


Then I start with my normal make up routine, beginning with my LOreal Paris Superstar Eye Liner and on this look I done just a small flick at the corner of my eyes.  Staying with eye liners, on my waterline I use Rimmel London Kohl Eye Pencil in Jet Black which I am still trying out but I am quite liking this product so far. Finally I apply L'Oreal Volume Million Lashes Mascara on my top and lower lashes.

To complete my look, I go back to my palette and take Armor and using an angled brush put it under my lower lash line. And ta-da, my finished eye look. You may add fake eyelashes which I would of done if had any handy at the time.


Let me know what your favourite smoky eye look is. I'd love to know!


Share:

Wednesday, 7 August 2013

July favourites


Sorry about the lack of blog posts lately but been very busy working and had a lot of personal issues going on, but that's me back now! Hurrah!

So i'm going to be telling you about me July Favourites and hopefully you will love them as much as i do and give them a shot! Please note, i have blogged about a few so you can refer to the previous blog posts (i will link them below).

I am going to start with my two Ted Baker make up bags i received, i got one for my birthday and bought one as a little gift to myself!

The first one is the leopard print make up bag. I got this as a gift from my parents for my 19th birthday which was a few weeks ago! I love this! It's so pretty and fits all my makeup in it perfectly! The other reason they bought it and i love it is that it's called, Karina. How awesome is that!?


The second Ted Baker bag is actually a toiletry bag but i bought it for a makeup bag/going out clutch!  It's a pretty light pink/nude colour with a pink bow on the front with a gold stud holding on the bow! It's so spacious inside and literally can hold everything in it, from my makeup to my perfumes, and even my eye shadow palettes!

Next is my all time favourite product of the month! This has basically been a lifesaver to my hair and made it in such good condition! I needed something for my hair to protect it from heat as it was damaging my hair that much my hair was snapping off! So i splashed out and bought Lee Stafford Shampoo and Heat protection spray! Straight away i could feel the difference of how much healthier my hair felt! It did make my hair feel a little dry at first but then as i dried it and applied the heat protection is went straight away and felt nicer and healthier! Now if you ever do buy the heat protection spray always remember spray it a arm length away as any closer it can make your hair sticky, but that's because of the natural oils in it! It cost me £23 for both. A little expensive but does wonder on your locks!

HEAT PROTECTION.

SHAMPOO

Next is the bareMinerals primer in the 15ml bottle. I have two of these, the full size and the smaller one! I got them both from my mum's friend who owns a hair salon and sells the bareMinerals products! I really am in love with this! I have heard a lot of people say that primer doesn't do much and it's a waste of money, but i notice a different when using it! All you do is a use a little bit, about the size of a pea, and apply on your face or eyes. I put it on before my eye shadow, so i apply to the lids of my eyes, do my foundation, then by the time i get around to applying eye shadows it has sunk in and it makes it last even longer on my eyes! It's a great investment! i am also really looking into buying the urban decay primer lotion as well! 


ELF cosmetics has been a huge part of my life recently, it's all i've been buying as its cheap and affordable! This is a lipstick or as they are commonly known as 'chubby sticks'. I usually apply a lighter lipstick to start off with then apply this, i am loving this at the moment! It has a glitter through it, which might not be everyone's taste but they do, do others without glitter through! It just makes my lips look amazing! And it's only about £1.50! What a bargain!


Swatch of the ELF cosmetics chubby stick

 Nearly there guys! (honest). My next product is the 'Rimmel wake me up concealer'. Now i didn't want to go along with the hype, but i ran out of my 'collection' concealer and decided after a lot of thinking to get this. Now i wasn't to sure at first as i wasn't impressed as it made my skin a little oily! I then applied the Rimmel face powder to set it and it looks fabulous! It takes away the dark circles under my eyes, and makes me look more fresh and adds a healthy glow! Definitely buy this! It's about £4.99. 


My blog on the 'Rimmel apocalips' lipgloss: http://itskarinax.blogspot.co.uk/2013/07/rimmel-apocalips.html


Other favourites:

Favourite song: Demi Lovato - Made in the USA
Favourite App: Candy Crush
Favourite Youtube of the month: Saconne Joly's
Favourite music video: One Direction - Best song ever

Karina xoxo

Share:

Saturday, 20 July 2013

Rimmel apocalips


I recently bought rimmel apocalips in the colour 'Luna' as I seen it in a video by my favourite youtuber 'zoella' and love the look of it!

Apocalips by rimmel is a lip liqueur and is basically a lipgloss and lipstick in one! It's very pigmented and last me ages! The colour I bought, Luna, is pink/orange and will only suit certain skin types, so make sure you do a tester before you apply as I wouldn't want you wasting your money on lip products that you don't like, as I have done it before and immediately regretted it! 

This product cost me, £5.99 but at the moment on superdrug they are doing a 2 for £10 offer, so get them whilst it last! You can also buy them in boots and no doubt any other drug store! I'd love to hear your opinions of this product! 

Karina xoxo

Share:
© Karina hearts... | All rights reserved.
Blogger Template Developed by pipdig